UV Surgeon — user manual
Edits UV islands with live texture preview. Islands carry their textures between Main, the Dock, and Target. Each map has its own Target texture. Export writes baked maps plus mesh UVs (OBJ, GLB, or a surgical FBX UV patch).
1. What UV Surgeon is
UV Surgeon is a 2D UV island editor for game and 3D work. You import a model that already has UVs, move / rotate / scale islands, keep textures in sync, then export updated maps and mesh UVs. It is not a 3D modeller and not an automatic unwrapper.
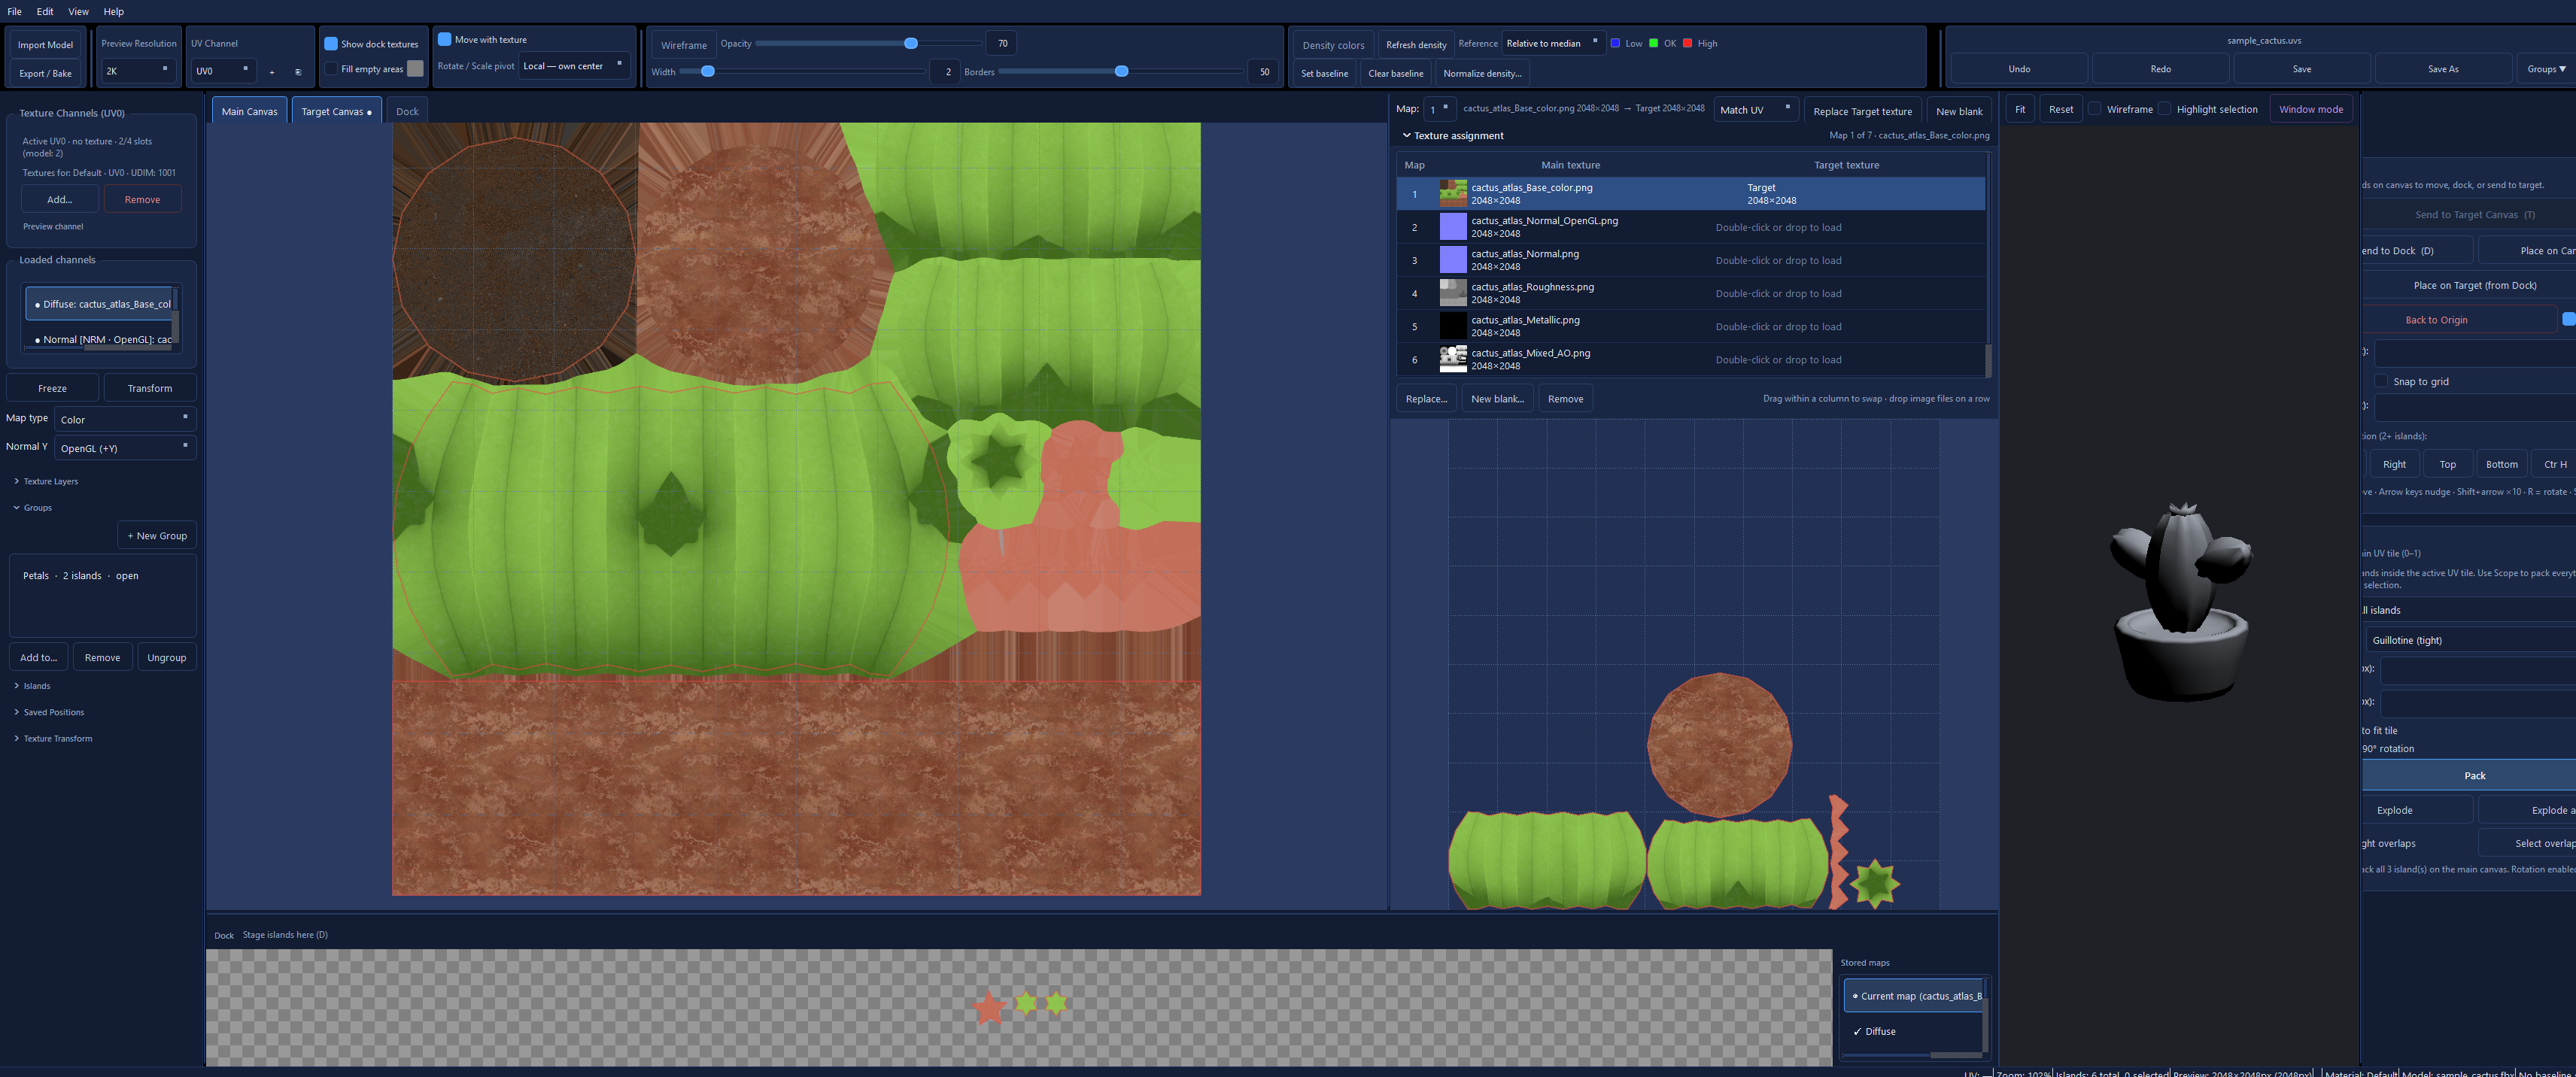
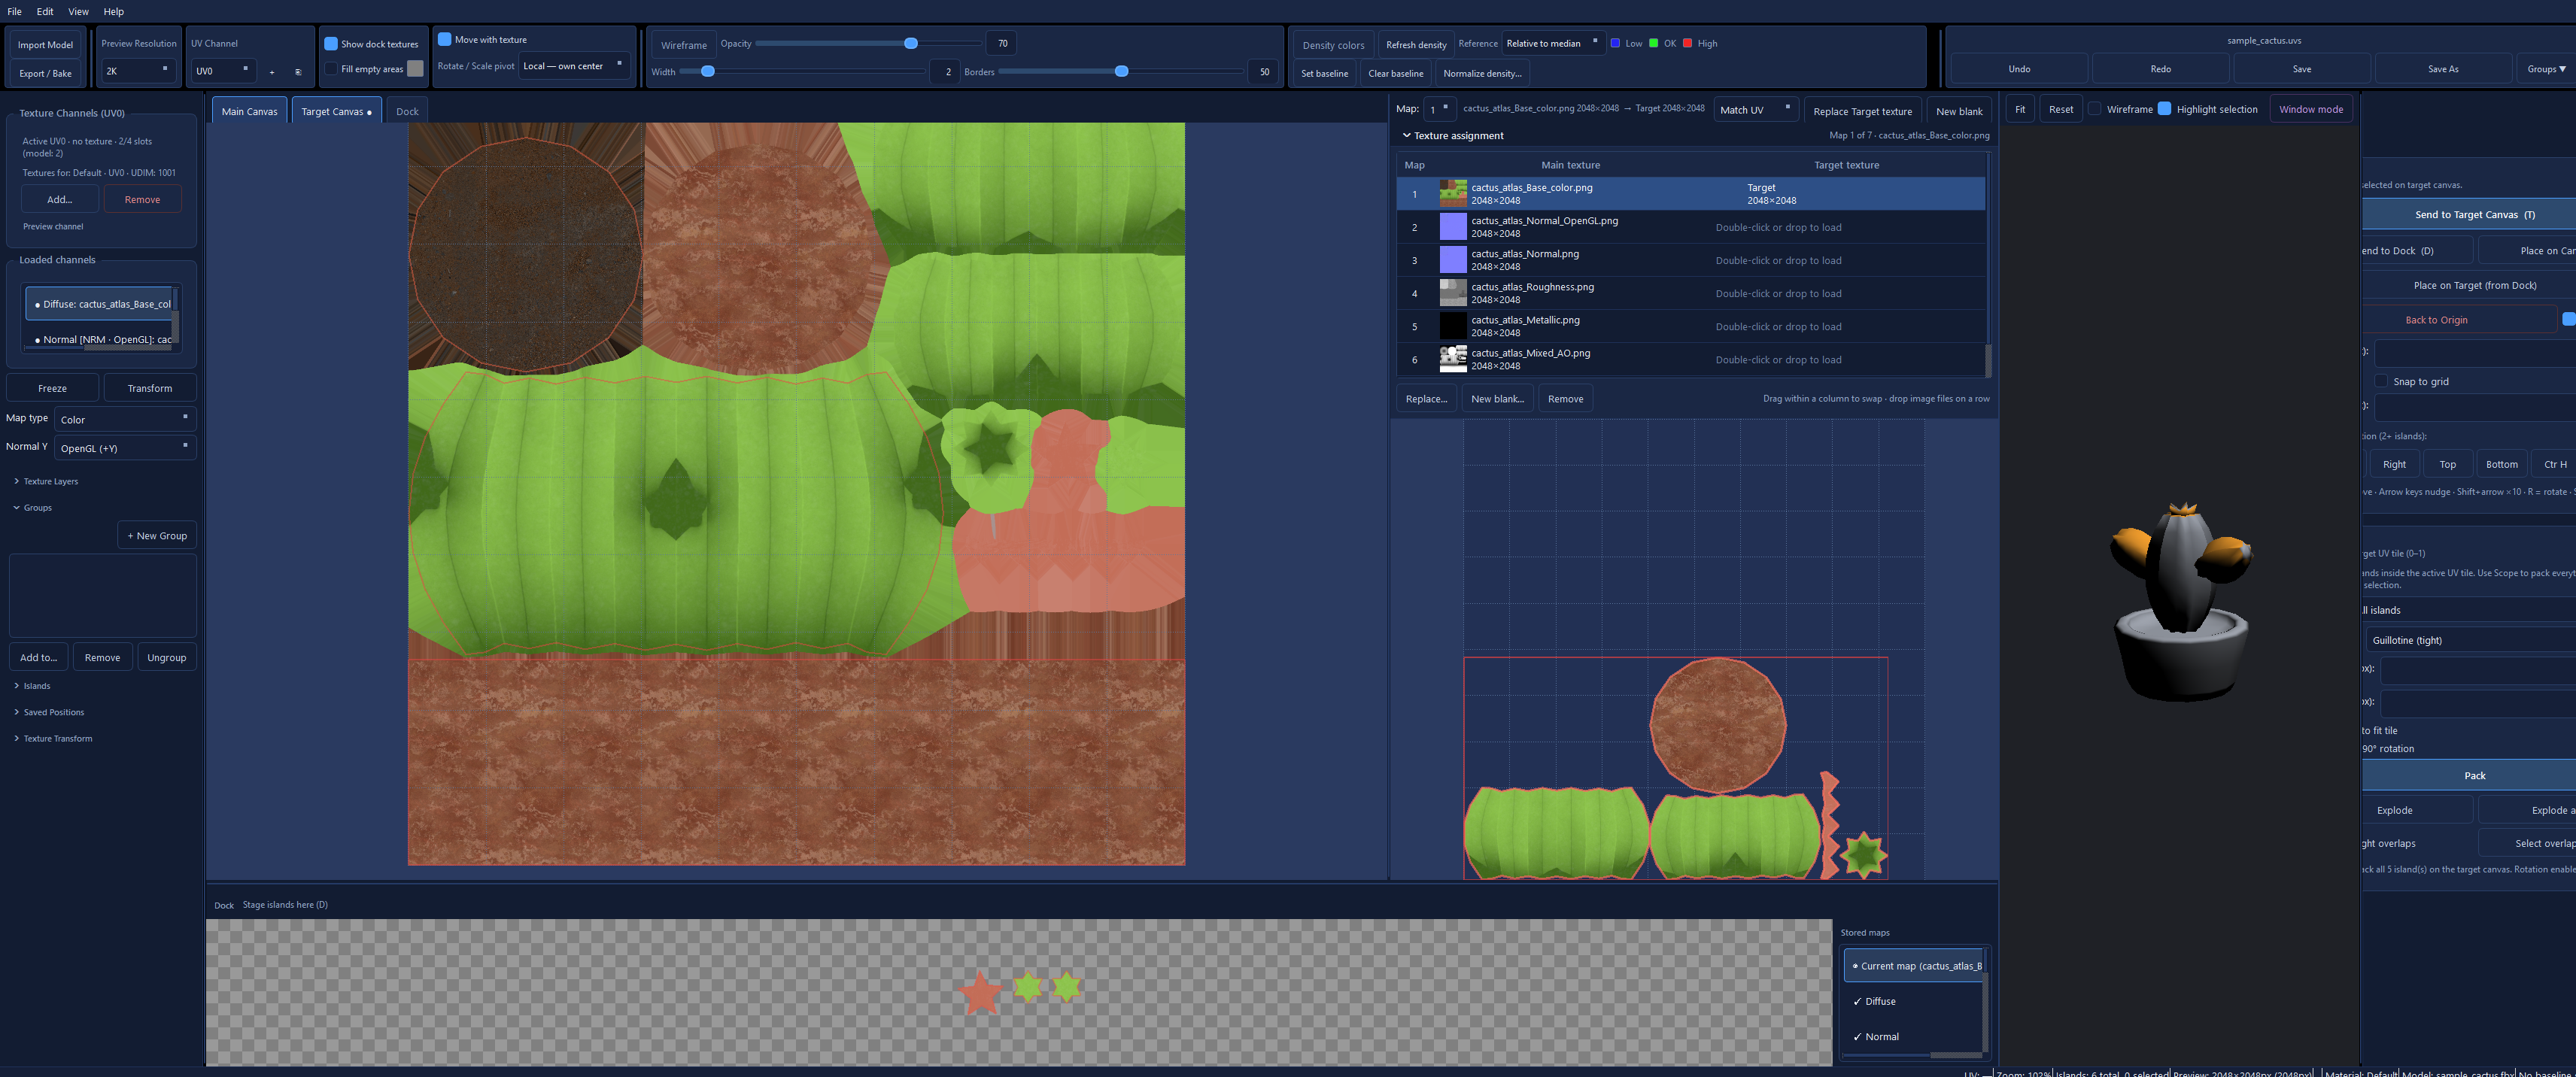
- Main canvas — edit the UV layout on a 0–1 (or UDIM) grid with texture preview.
- Dock — park islands under the canvases. The maps they carry are stored with them.
- Target canvas — a second UV space. Each map of the UV channel has its own Target texture, and islands arrive with their pixels.
- Export — bake textures (PNG / TGA / JPEG) and write mesh UVs.
Tile Surgeon builds world-tile edges and corridors. Stitch Surgeon packs free sprites into atlases. UV Surgeon edits UV islands on 3D meshes. Sprite Surgeon (when it ships) pulls sprites out of existing sheets.
2. Disclaimer and limits
UV Surgeon helps you edit UVs and textures you supply. It does not grant rights to anyone else’s art or models. Keep backups of source meshes and projects before export.
- Your content stays yours. Exports and
.uvsprojects remain your property. You are responsible for the legality of imports. Official terms: Help → License Agreement. This manual does not change the EULA. - Not an unwrapper. The model must already have UV islands. The app rearranges them; it does not cut new seams in 3D.
- Import formats. OBJ, binary FBX 7.1+, and GLB/GLTF. ASCII FBX, pre-7.1 binary FBX, sparse GLB accessors, and Draco-compressed GLB are not supported.
- Mesh export. OBJ (UV channel 0 only), GLB (up to four UV sets, triangulated), and FBX UV update in a copy of the source file when the project was imported from binary FBX. Instanced FBX meshes are skipped. Extra UV slots you add only inside the app are not written as new FBX layers.
- OBJ from GLB. Allowed, with limits: triangulated mesh, UV0 only, no materials/textures in the OBJ. Prefer GLB export for GLB sources.
- 3D preview. If OpenGL is unavailable, 2D editing still works. Use View → Retry 3D Preview.
3. Quick start (5 minutes)
- Help → Open Sample Project — bundled cactus (FBX + PBR maps as texture channels). Or File → Import Model (Ctrl+M) for your own OBJ/FBX/GLB.
- File → Add Texture Channel (Ctrl+T) — if you imported your own mesh, add a diffuse map for preview and bake.
- Click an island (Shift for more, drag empty space for a box). Drag to move.
- Hold R and drag to rotate, S and drag to scale. Toolbar Rotate / Scale pivot: Local (each island’s center) or Global (whole selection).
- Optional: Ctrl+G groups islands. D parks them in the Dock with their textures. Turn on Target Canvas, load or create a Target texture for the map, then T sends the islands there — UV and pixels together. Pack from the right sidebar.
- File → Save As —
.uvsproject. Then File → Export / Bake (Ctrl+E).
On first launch, Welcome offers Open Sample Project (default) or Start Empty. After that, use Help → Open Sample Project anytime. The sample copies into a writable folder so you can save and export without touching the install.
4. UI overview

5. Import
File → Import Model opens OBJ, FBX, or GLB. After you pick a file, you can merge all materials into one set (useful when the whole model shares one UV space).
- FBX — groups follow FBX materials, not mesh object names. N-gons are kept. Up to four UV channels from the file.
- OBJ — groups follow
usemtl. One UV map in the mesh file; you can still add UV1–UV3 in the app for editing. - GLB — triangulated on import. Multiple TEXCOORD sets when present.
6. Canvas, selection, and groups
- Wheel zooms. Space + drag or middle mouse pans. Ctrl+0 reset zoom, Ctrl+F fit.
- Click an island; Shift+click adds; drag on empty canvas for box select. Ctrl+A select all, Ctrl+D deselect.
- Arrow keys nudge; hold Shift for a larger step.
Groups
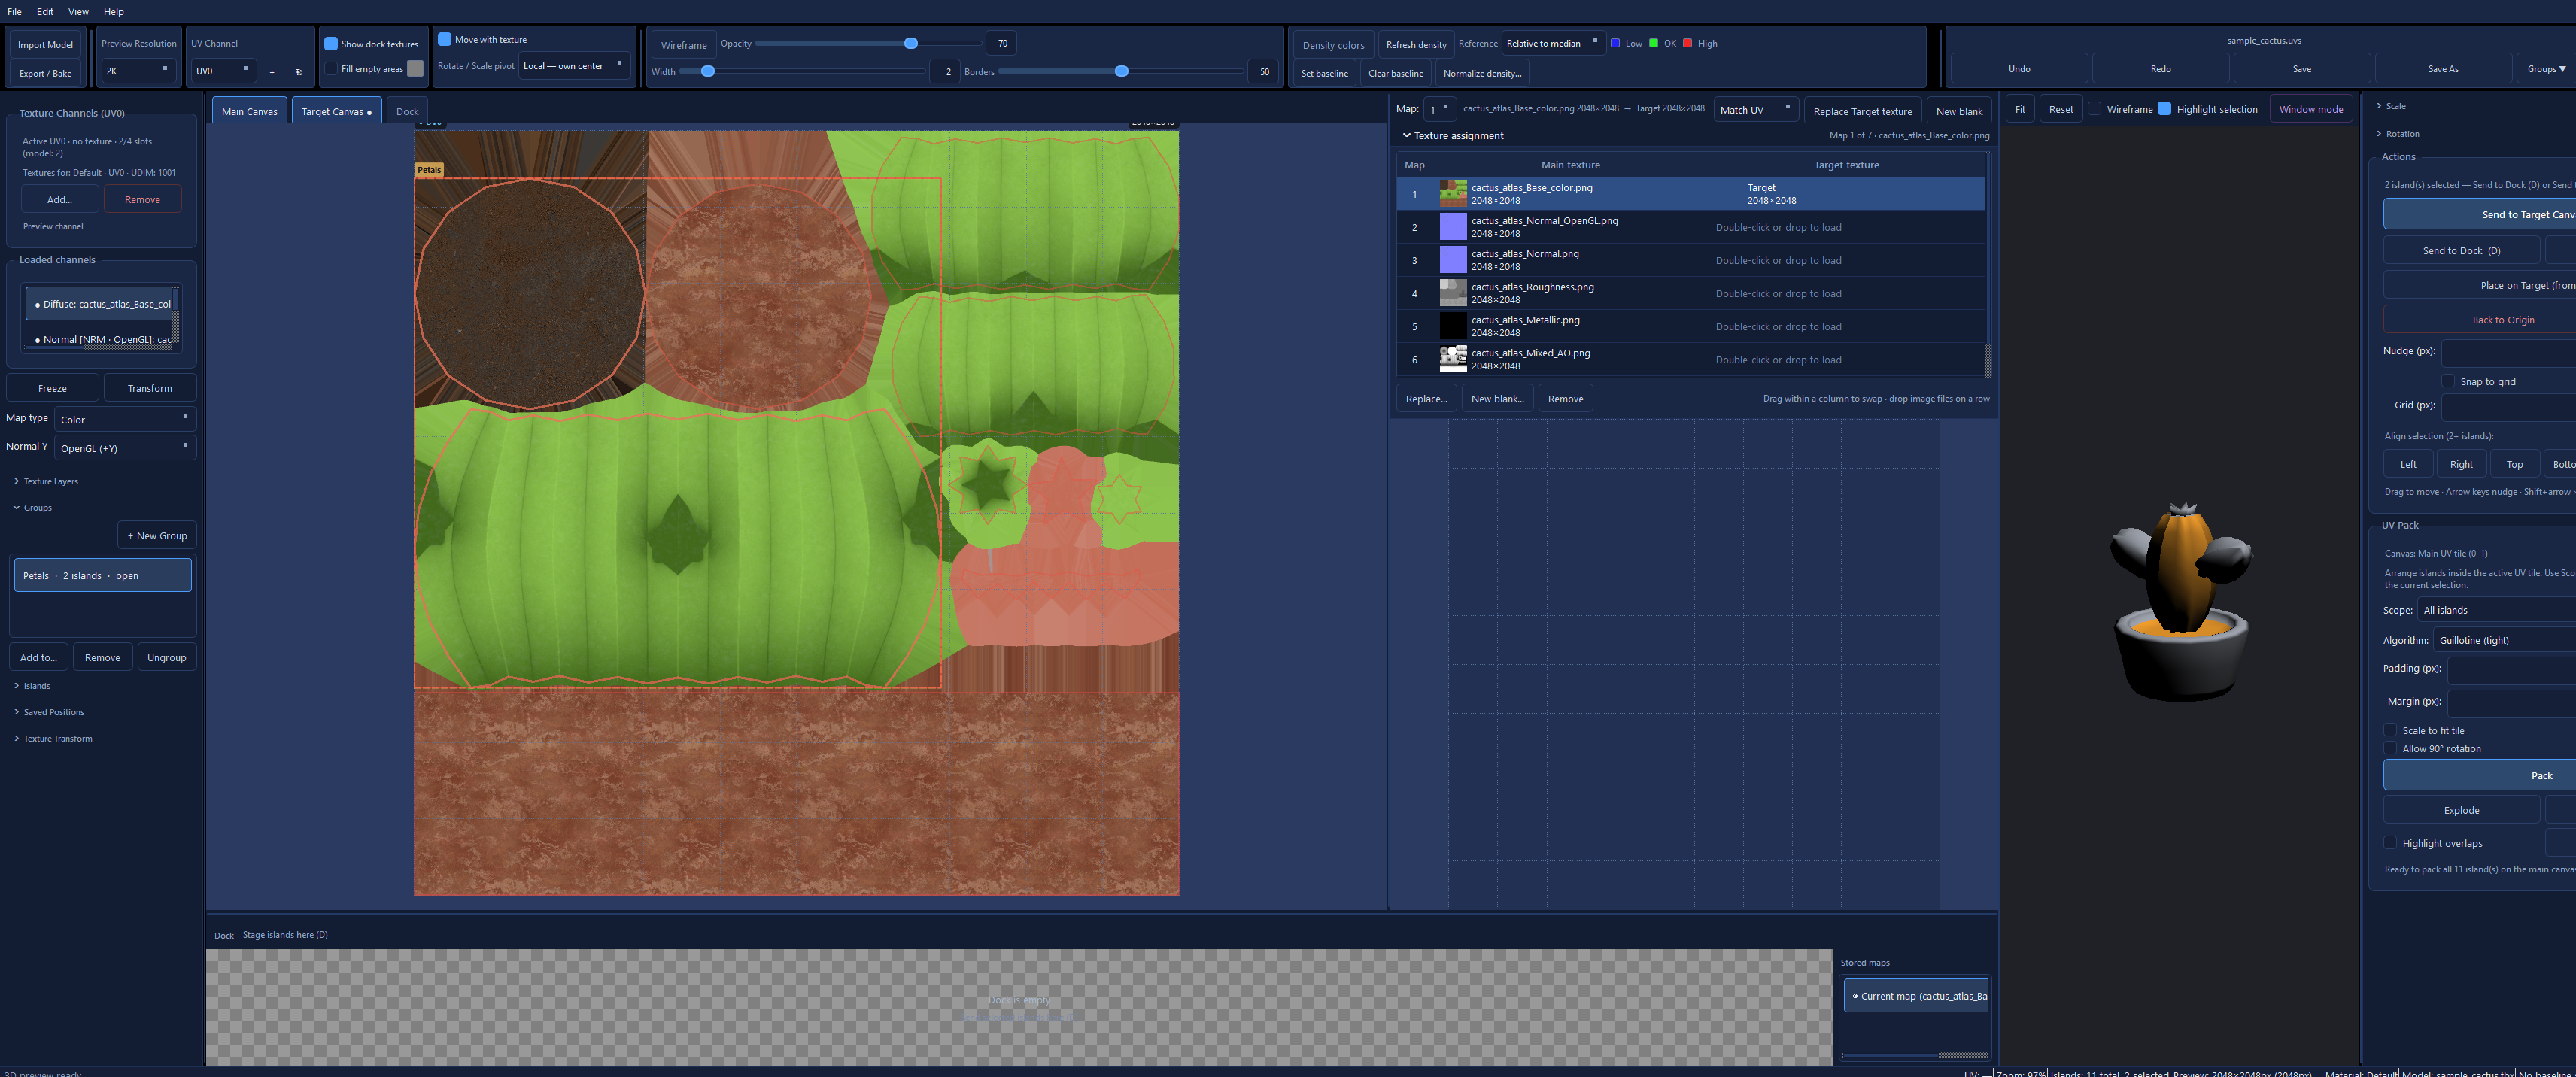
Select two or more islands and press Ctrl+G (or + New Group in the left sidebar). Named groups appear under Groups. Click a group in the list to reselect its members. Grouped islands transform together on move / rotate / scale, and Pack treats a group as one rigid unit so members stay in the same relative layout.
- Ctrl+Shift+G (or Dissolve) drops the grouping without deleting islands.
- Lock a group in the sidebar if you want to keep the set from accidental edits.
- Groups are per canvas: main and Target each keep their own list.
7. Move, rotate, scale
Drag a selection to move. Hold R (or Alt+drag) to rotate; hold S to scale. Esc cancels an in-progress gesture.
The toolbar combo Rotate / Scale pivot applies to both rotate and scale:
- Local — own center — each island turns or grows around its own centroid. Centroids stay put when scaling.
- Global — selection — the whole selection shares one pivot (mean of centroids). Multi-island scale spreads from that center like one cell.
Move with texture (toolbar, or U) moves the preview with the island, and it is what a send to the Dock or Target carries. Unchecked is UV-only: the shape moves, the pixels stay.
Sidebar numeric scale for a single island still uses that island’s own center.
8. Texture channels
Each material set can have several texture channels (diffuse, normal, …). Click a channel in the sidebar to preview it on the canvas. The UV channel in the toolbar switches which set of maps you are editing — and, with it, that channel’s Target textures. Freeze a channel to leave it out of texture transforms and out of a send to Target.
Adding a second UV channel on an OBJ project shows a notice: OBJ mesh export still writes UV0 only; use GLB for multiple UV sets, or FBX export if the source was FBX.
UDIM: if several tiles are detected (1001, 1002, …), pick which tiles to load. Sequences are optional — most game assets use a single 0–1 tile.
9. Dock
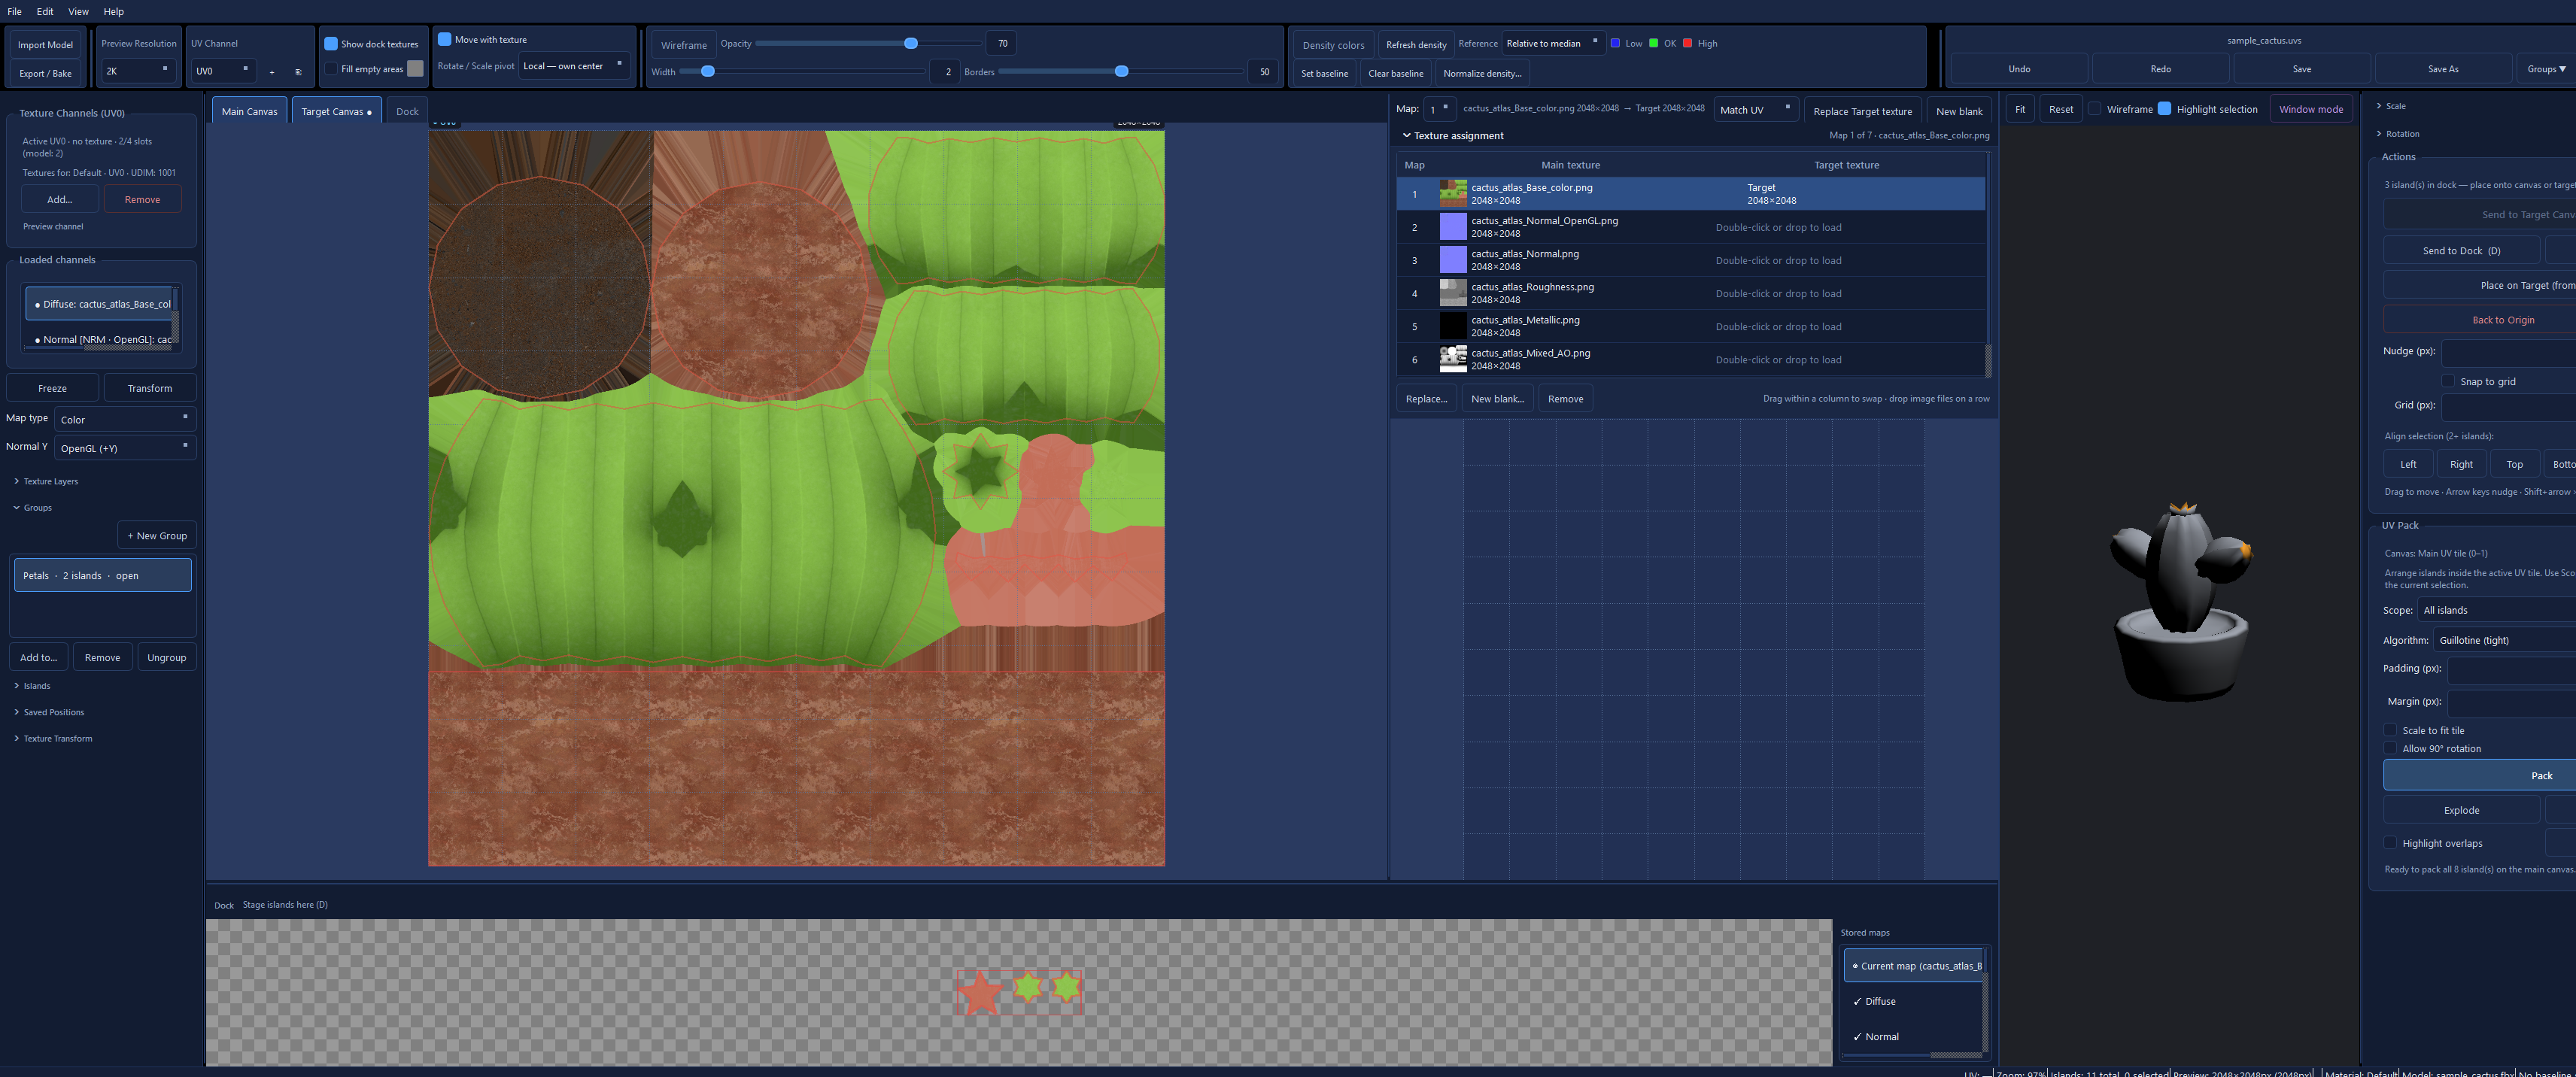
The Dock is a shelf under the canvases. Show or hide it with Dock on the mode bar. Park islands there while you rearrange a tile, then place them back. An island takes its texture with it.
- Select islands on Main or Target and press D, or Send to Dock in the right sidebar.
- Every map the island is carrying is stored with it. Toolbar Show dock textures toggles the thumbnails. With Move with texture off, only the UV shape is parked.
- Stored maps, on the right of the Dock, lists those maps. Click one to preview it on the docked islands. Right-click and choose Use … for the current Main map when that stored cut should become the map you are editing. Current map returns the preview to the map selected on Main.
- Place on Canvas puts the selection back on Main, texture included. If an island came from another material, you can switch to that material or keep the current one.
- Place on Target (from Dock) sends the dock selection to Target. T does the same while that Dock selection is active.
- A scaled or rotated island raises Active Transforms Detected: apply those transforms to the placement, or place the untransformed shape. If the stored texture and the destination differ in size, Resolution Mismatch asks you to keep the original texel density or match the destination resolution (see Target).
- Pack on Main skips docked islands. They stay off the tile until you place them.
10. Target canvas and pack
Target is a second UV space beside Main. Turn it on with Target Canvas on the mode bar (the button shows a dot once this UV channel has a Target texture). Islands move there with their pixels. Hiding Target while something is selected on it asks first — hiding clears that selection.
One Target texture per map
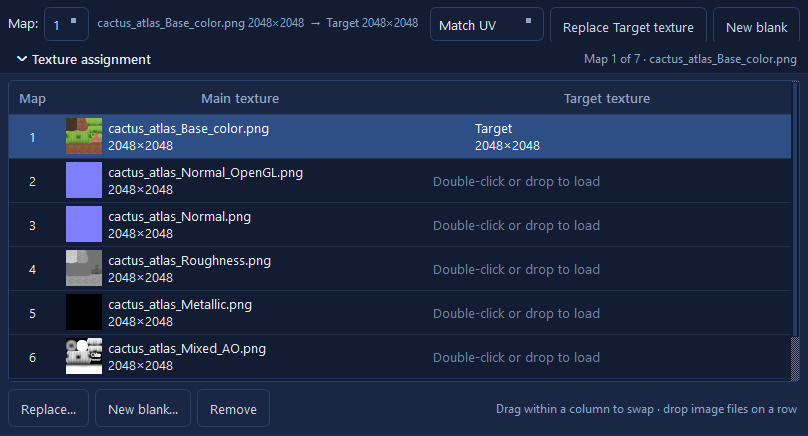
Each map of the UV channel pairs one Main texture with its own Target texture. Map 1 might be the diffuse, Map 2 the normal. The map you are viewing is the background of the Target canvas, and every island there shows that map’s cut. Switching the UV channel in the toolbar switches to that channel’s pairs.
Open Texture assignment above the Target canvas.
- Load… / Replace…, or double-click the Target cell. You can also drop an image file onto a row.
- New blank… creates an empty Target texture. The size you pick is the Target size for this UV channel.
- Remove clears that map’s Target texture. Islands already on Target stay. If it was the last Target texture, you cannot send more islands until you load or create one again.
- Drag inside a column to swap two Main textures, or two Target textures. The other column stays where it is.
- A map with no Target texture of its own is shown, and later baked, as black at the Target size.
The header reads Main name and size → Target name and size and chooses what a size difference means:
- Match UV — the island keeps its UV size.
- Hold density — the island keeps its texel size when you bake.
That choice only matters when the Target texture is a different size from the Main texture. The same setting is on the row’s right-click menu, under When sizes differ.
Sending islands
You need at least one Target texture before an island can land there — it sets the Target size. Press T without one and the app asks you to load a texture or create a blank.
- Select islands on Main or in the Dock and press T, or Send to Target Canvas. From Target, D parks them in the Dock with the pixels they have there.
- From Main, each map is cut from the live texture. From the Dock, the island brings the maps it stored when it was docked. Frozen maps are left unchanged.
- Active Transforms Detected — the island is scaled or rotated. Apply those transforms to the placement, or place the untransformed shape.
- Resolution Mismatch — the source and the Target texture differ in size. Keep Original Texel Density keeps the pixel density, so the island takes more or less UV space. Match target resolution keeps the UV footprint, and the pixel density scales. Placing back on Main offers Match Main Canvas resolution with the same meaning.
- Click the Target canvas to make it the active field. Pack, explode, and overlap then apply there.
Pack
UV Pack in the right sidebar arranges islands inside the active 0–1 tile. It does not unwrap; it only repositions (and optionally rotates) what you already have.
- Scope — All islands on the active canvas, or Selected only.
- Algorithm — Shelf (fast) or Guillotine (tighter packing).
- Padding / Margin — pixel gap between islands and from the tile edge.
- Scale to fit tile — uniformly scale the pack set so it fits the tile, then arrange.
- Allow 90° rotation — try a quarter-turn per island when it densifies the pack.
- Grouped islands stay glued (one pack unit). Docked islands on the main canvas are skipped.
Explode is the opposite move: it fans overlapping islands into rows above/below the tile so you can sort them by hand, then pack again.
11. 3D preview
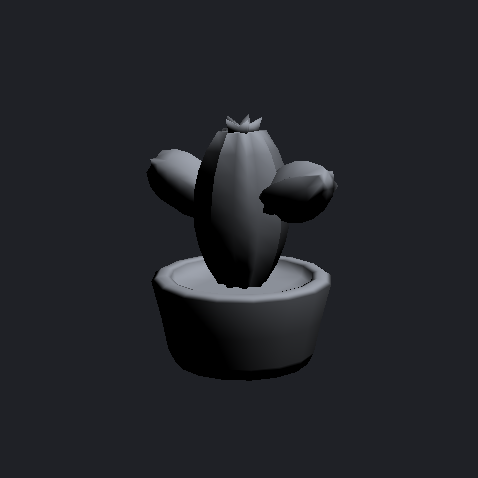
View → Model Preview shows the mesh with current UVs when OpenGL works. On some laptops (hybrid NVIDIA/AMD/Intel) the first probe can fail: 2D stays usable. View → Retry 3D Preview runs the probe again. There is no “set this GPU in Control Panel” customer step — if 3D stays unavailable, keep working in 2D.
12. Density and overlap
Wireframe density colors compare texel density across islands (stretched vs dense). Overlap highlight marks islands that occupy the same UV space. Use these as guides, not as a substitute for looking at the bake.
13. Projects, autosave, undo
- Ctrl+S / Ctrl+Shift+S save a
.uvsproject (layout + texture links + edits). - Closing with unsaved changes asks to save. Autosave can restore after a crash once the project has been saved at least once (drafts live next to the project in
.uvsurgeon_autosave). - Ctrl+Z / Ctrl+Y undo and redo transforms and related edits.
14. Export / bake
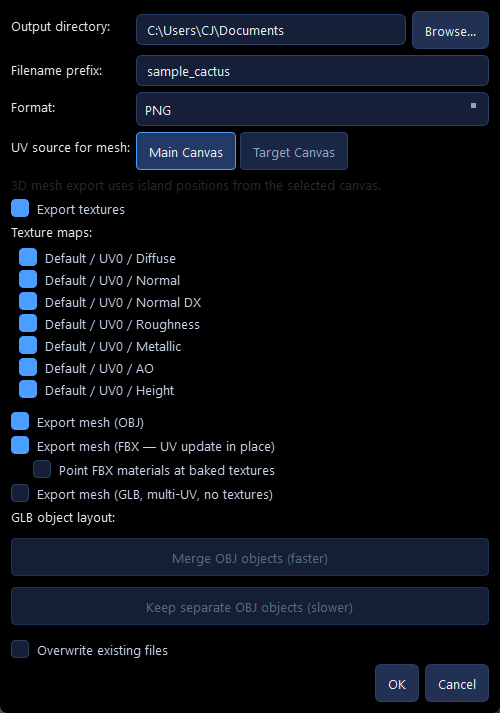
File → Export / Bake (Ctrl+E). Pick an output folder and prefix. Long bakes can be cancelled from the progress dialog.
Main Canvas or Target Canvas chooses which island positions the bake and the mesh use. On Target, each Texture assignment row is baked as its own image. A row without a Target texture is baked onto black at the Target size, the same as the canvas shows it.
Mesh export writes each UV channel from that one canvas. Islands still on the other canvas, or sitting in the Dock, are listed under Islands Outside Export Canvas. Export Anyway writes them into a strip to the right of the 0–1 square in the exported file only. Move to Margin makes that same move in the project, so you can look at it before exporting.
| Output | Notes |
|---|---|
| Textures | PNG, TGA, or JPEG at canvas/channel resolution. Separate files from the mesh. |
| OBJ | Updates UV0 (vt). Face topology preserved for OBJ/FBX sources. GLB sources: triangulated, UV0, no materials in the OBJ (confirm dialog). |
| GLB | Triangulated; up to four UV sets; no textures in the GLB (export textures separately). |
| FBX | Only if the project was imported from binary FBX. Writes a copy of the file with UV layers patched in place. Polygons, normals, smoothing, materials, and skins are copied, not rebuilt. Optional: point materials at baked texture files (off by default). |
Choose Main or Target island positions. Islands left on the other canvas or in the Dock are reported before the mesh is written. Instanced (shared) FBX meshes are skipped with a warning. ASCII FBX cannot be written. Always keep the original file; the exporter writes a new copy beside your prefix.
15. Shortcuts
F1 opens the in-app list. Shortcuts apply when the canvas or dock has focus.
| Action | Shortcut |
|---|---|
| Import model | Ctrl+M |
| Add texture | Ctrl+T |
| Save / Save as | Ctrl+S / Ctrl+Shift+S |
| Export / bake | Ctrl+E |
| Undo / redo | Ctrl+Z / Ctrl+Y |
| Pan / zoom | Space+drag · wheel |
| Rotate / scale | Hold R / S + drag |
| Group / dissolve | Ctrl+G / Ctrl+Shift+G |
| Dock / target | D / T |
| UV-only move | U |
16. FAQ
Where is the sample?
Help → Open Sample Project loads the bundled cactus (FBX plus atlas maps as texture channels). Use it to try groups, dock, Target pack, global scale, and 3D preview before importing your own mesh.
Pack moved the wrong canvas?
Click the canvas you want first (Main or Target). Pack uses the active field. Islands sitting in the Dock are skipped on Main.
Why is Target black?
That map has no Target texture. Load one, create a blank, or switch Map to a row that has one. Export does the same: a row without a Target texture bakes black.
The island changed size when I sent it
The source and the destination were different resolutions, and Keep Original Texel Density keeps that pixel density by changing how much UV space the island uses. Choose Match target resolution (or Match Main Canvas resolution) when the UV footprint should stay put.
The texture did not come with the island
Move with texture was off, so only the UV shape moved. Frozen maps are also left unchanged. A docked island brings the maps it stored, which you can preview under Stored maps.
Why didn’t FBX export show up?
The FBX checkbox appears only when the project’s source model is a binary .fbx.
Why did an island not export in FBX?
Instanced meshes that share one Geometry node cannot take unique UVs; they are skipped. Extra UV channels created only in the app are not added as new FBX layers.
3D preview is blank / retry?
Use View → Retry 3D Preview. 2D editing does not depend on it.